Enable Microphone settings
A. On Your Web Browser (for web applications)
When using a website that requires your microphone (like a video conferencing tool or online recorder), your browser will typically ask for permission the first time.
1. Google Chrome:
-
When prompted:
-
When a website asks to use your microphone, a prompt will appear at the top-left of the browser window.
-
Click "Allow".
-
-
Changing existing permissions:
-
Go to the website.
-
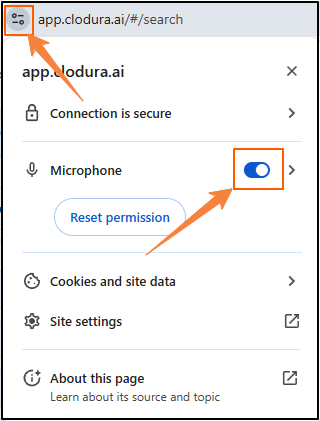
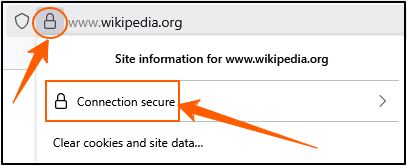
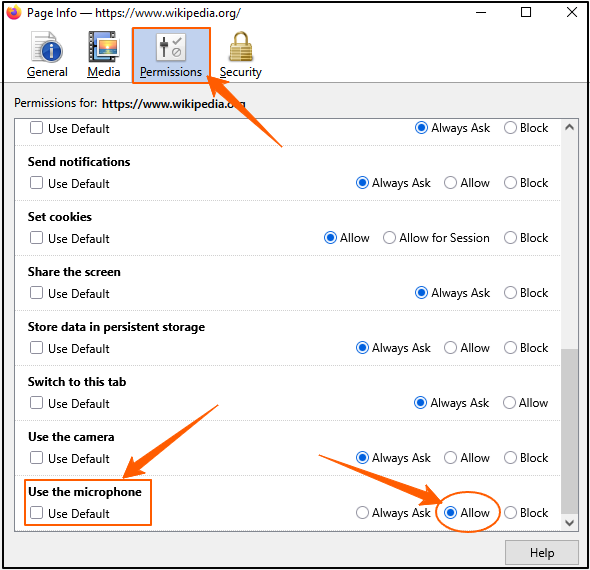
Click the lock icon (or info icon) to the left of the website address in the address bar.
-
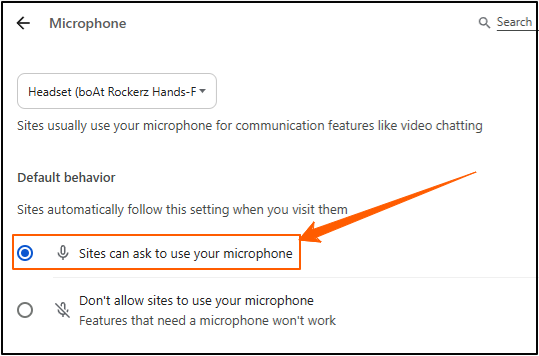
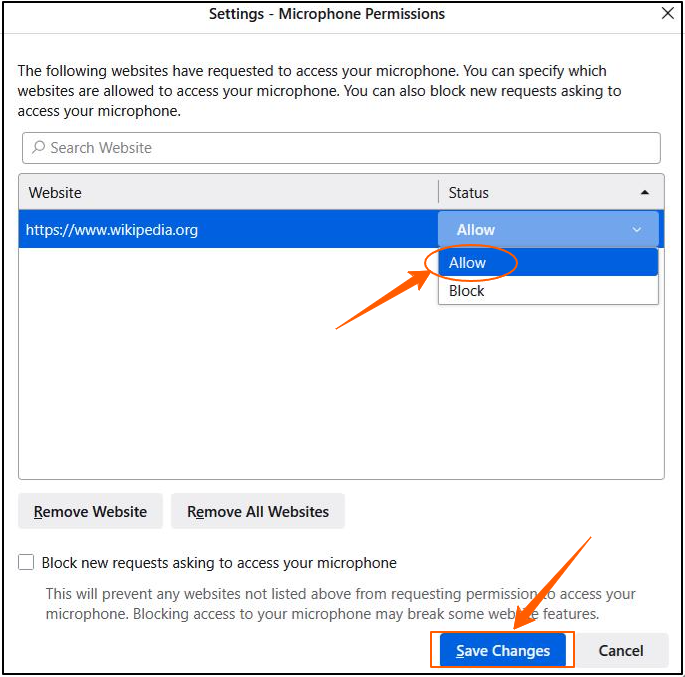
In the dropdown, you'll see "Microphone." Select "Allow" from the dropdown menu if it's currently set to "Block" or "Ask."
-
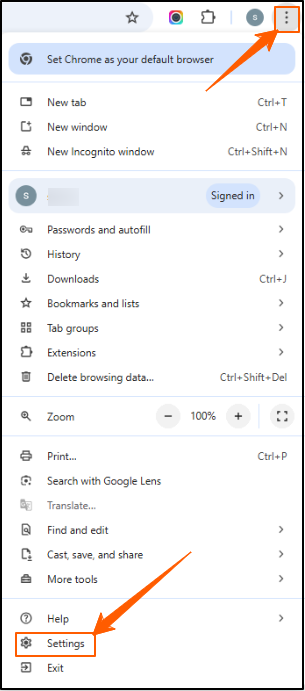
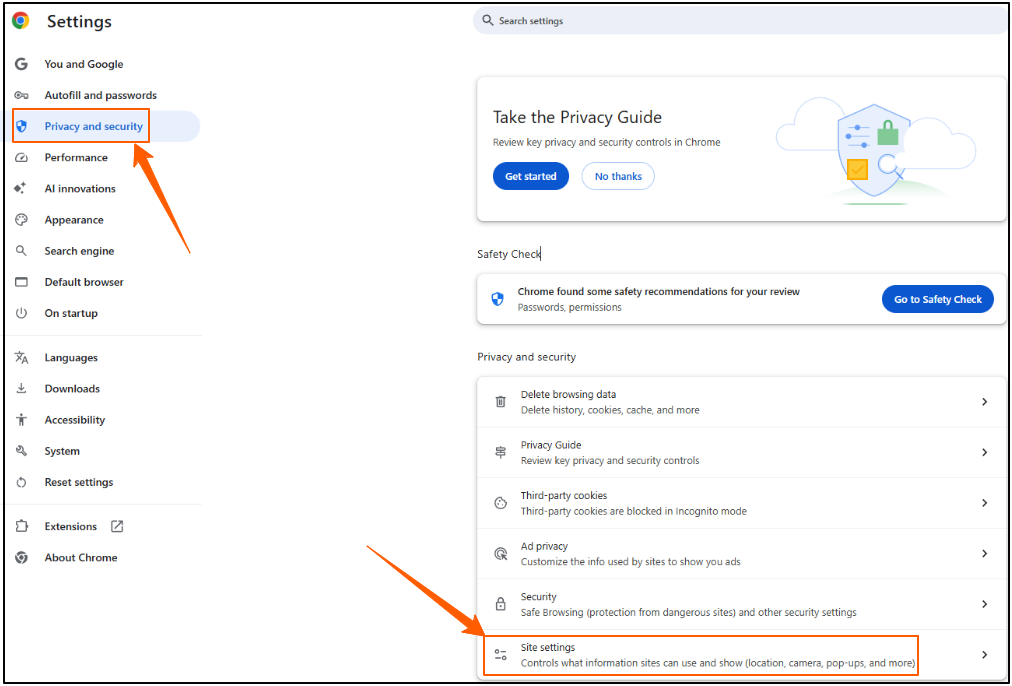
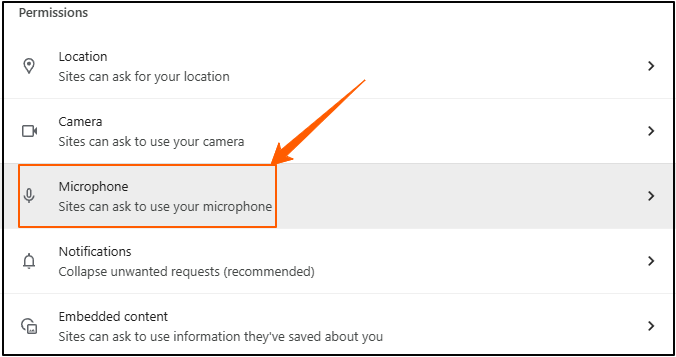
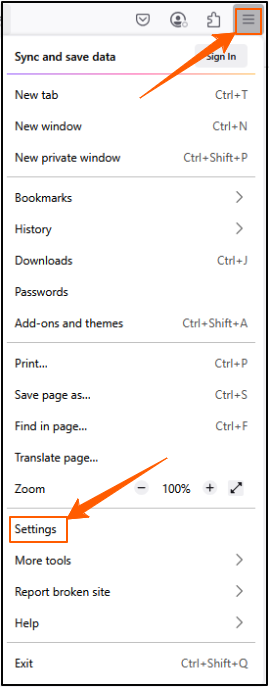
Alternatively, go to Chrome Settings (three dots in top-right) > Privacy and security > Site settings > Microphone. Here you can manage permissions for all sites.
-
Reference Link for Google Chrome: Use your camera and microphone in Chrome - Google Chrome Help
2. Mozilla Firefox:
-
When prompted:
-
When a website asks to use your microphone, a bar will appear at the top of the window.
-
Select "Allow" (and optionally "Remember this decision").
-
-
Changing existing permissions:
-
Go to the website.
-
Click the permissions icon (usually a small microphone or a shield) in the address bar.
-
You can change the permission there.
-
Alternatively, go to Firefox Settings (three lines in top-right) > Privacy & Security > Permissions > Microphone (Settings...). Here you can manage permissions for all sites.

-
Reference Link for Mozilla Firefox: How to manage your camera and microphone permissions with Firefox - Mozilla Support
3. Apple Safari:
-
When prompted:
- A prompt will appear asking for microphone access. Click "Allow".
-
Changing existing permissions:
-
Go to the website.
-
In the Safari menu bar, click Safari > Settings (or Preferences).
-
Go to the Websites tab.
-
Click Microphone in the sidebar.
-
Find the website in the list and set its permission to "Allow" or "Ask".
-
Reference Link for Apple Safari: Change Websites settings in Safari on Mac - Apple Support (Look for the "Microphone" section on this page).
4. Microsoft Edge:
-
When prompted:
- A prompt will appear at the top of the browser window. Click "Allow".
-
Changing existing permissions:
-
Go to the website.
-
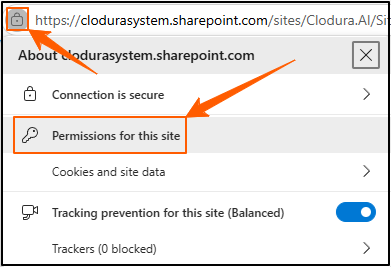
Click the lock icon (or info icon) to the left of the website address in the address bar.
-
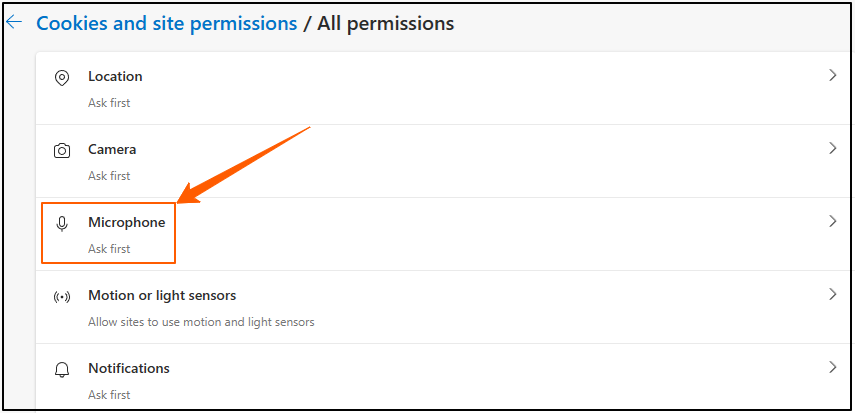
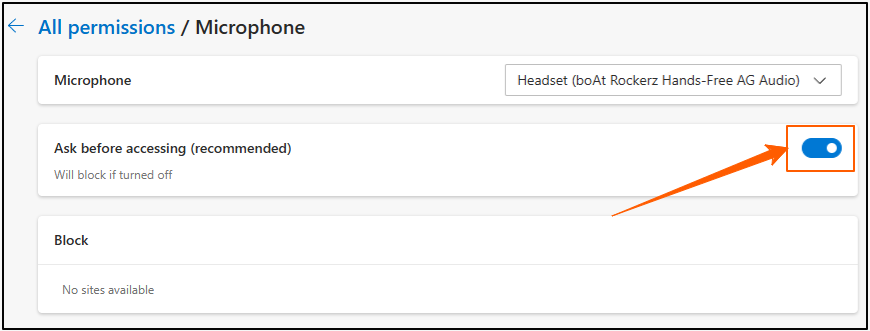
In the dropdown, you'll see "Microphone." Select "Allow" from the dropdown menu.
-
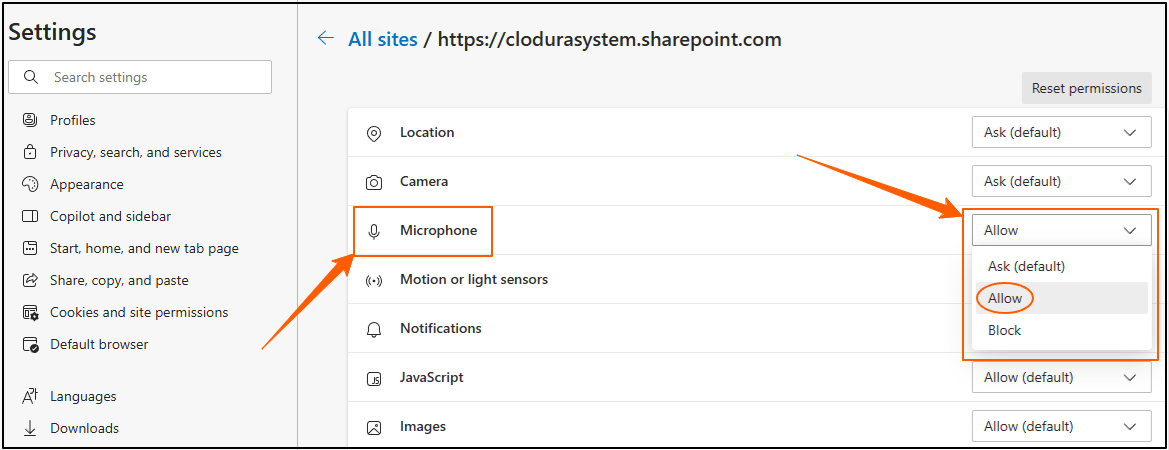
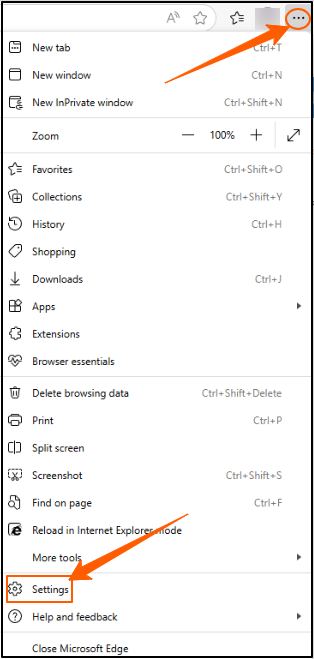
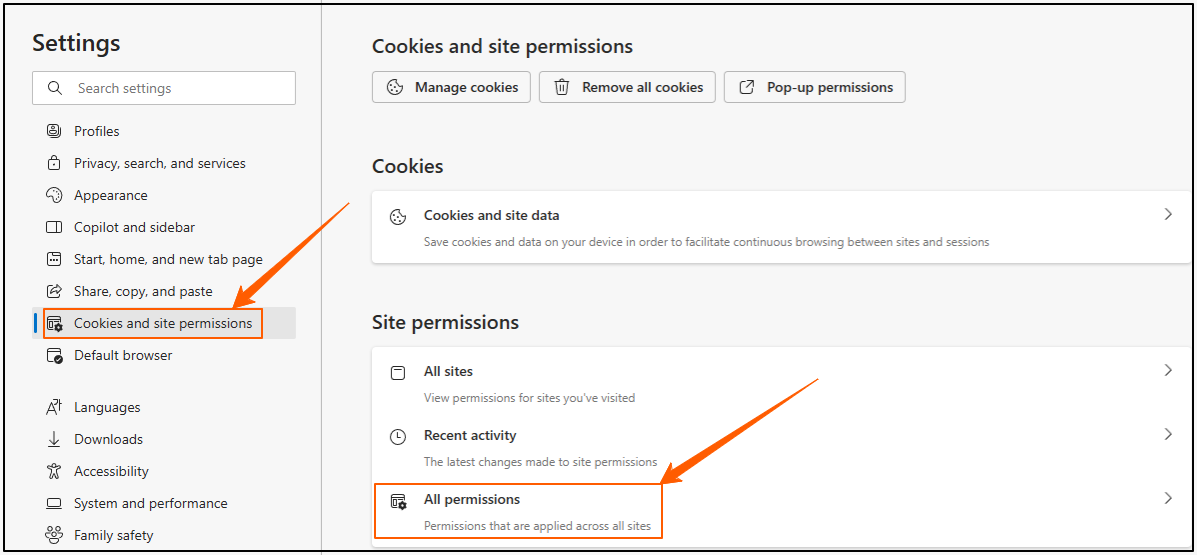
Alternatively, go to Edge Settings (three dots in top-right) > Cookies and site permissions > Microphone. Here you can manage permissions for all sites.
-
Reference Link for Microsoft Edge: Turn camera and microphone on or off for websites in Microsoft Edge - Microsoft Support
B. On Your Device's Operating System
1. Windows:
-
Via Settings:
-
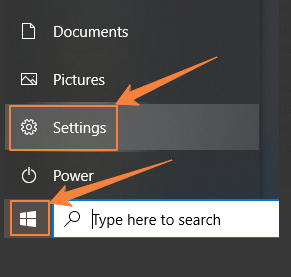
Go to Start > Settings > Privacy & security.

-
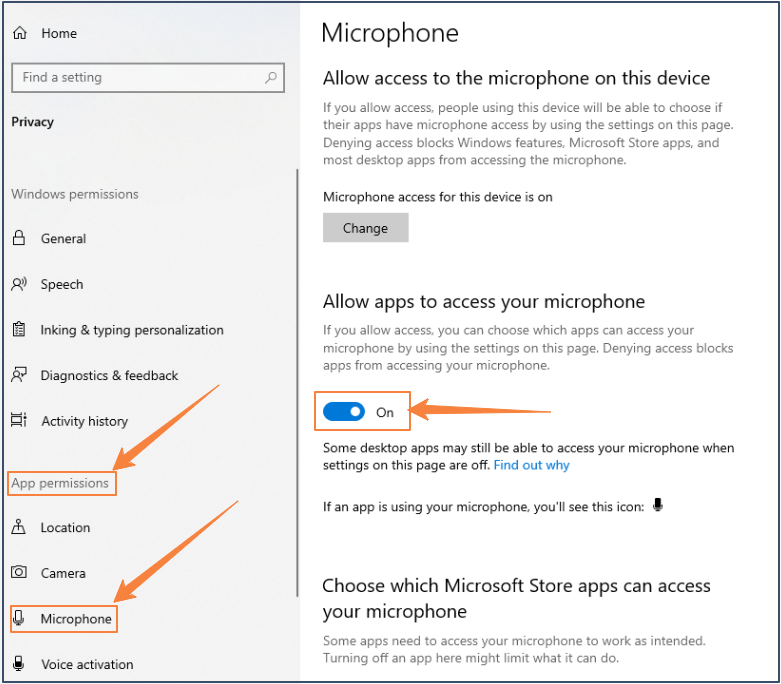
Under "App permissions," click on Microphone.
-
Make sure "Microphone access" is turned On.
-
Also, ensure "Let apps access your microphone" is turned On.
-
You can then choose which specific Microsoft Store apps have access. - For desktop apps (like Zoom, Discord, etc.), ensure "Let desktop apps access your microphone" is turned On.
-
-
Check Default Device:
-
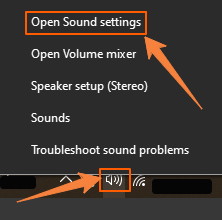
Right-click the speaker icon in your taskbar and select "Sound settings" (or go to Start > Settings > System > Sound).
-
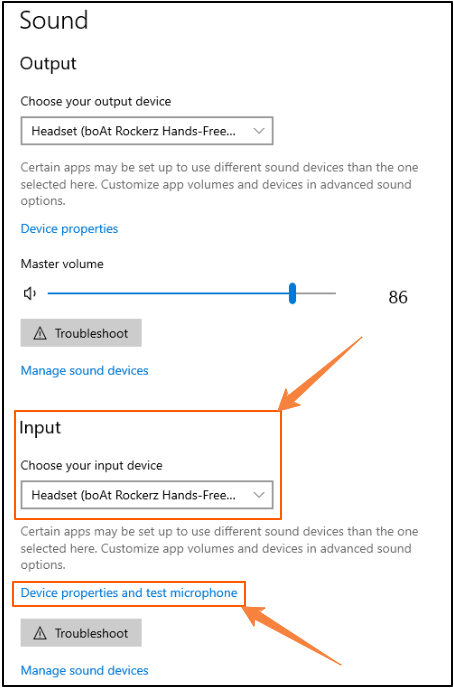
Under "Input," make sure your desired microphone (e.g., headset mic, built-in mic) is selected as the input device.
-
Speak into the microphone and check the "Test your microphone" bar to see if it's picking up sound.
-
Reference Link for Windows: Turn on app permissions for your microphone in Windows - Microsoft Support
2. macOS:
-
Via System Settings:
-
Click the Apple menu () in the top-left corner and select System Settings (or System Preferences on older macOS versions).
-
Click Privacy & Security in the sidebar.
-
Scroll down and click on Microphone.
-
You'll see a list of applications that have requested microphone access. Toggle the switch On next to the apps you want to grant permission to.
-
Reference Link for macOS: Control access to the microphone on Mac - Apple Support (Note: The URL might vary slightly by region, but this is the official Apple Support guide).
3. Android (Phone/Tablet):
-
Via App Permissions:
-
Go to Settings.
-
Tap Apps (or "Apps & notifications," "Applications," etc.).
-
Find and select the specific app you want to grant microphone access to.
-
Tap Permissions.
-
Tap Microphone.
-
Select "Allow only while using the app" or "Allow" (avoid "Deny").
-
-
Quick Settings (some devices):
-
Swipe down from the top of your screen to open the Quick Settings panel.
-
Look for a microphone icon. If it's highlighted or showing as "off," tap it to enable global microphone access.
-
Reference Link for Android: Change app permissions on your Android phone - Google Help
4. iOS (iPhone/iPad):
-
Via App Permissions:
-
Go to Settings.
-
Scroll down and tap on the specific app you want to grant microphone access to (e.g., "WhatsApp," "Zoom").
-
You'll see a list of permissions. Toggle the switch next to "Microphone" to the On (green) position.
-
Reference Link for iOS:
About privacy and Location Services in iOS, iPadOS, and watchOS - Apple Support (This page covers various privacy settings, including microphone access for apps).